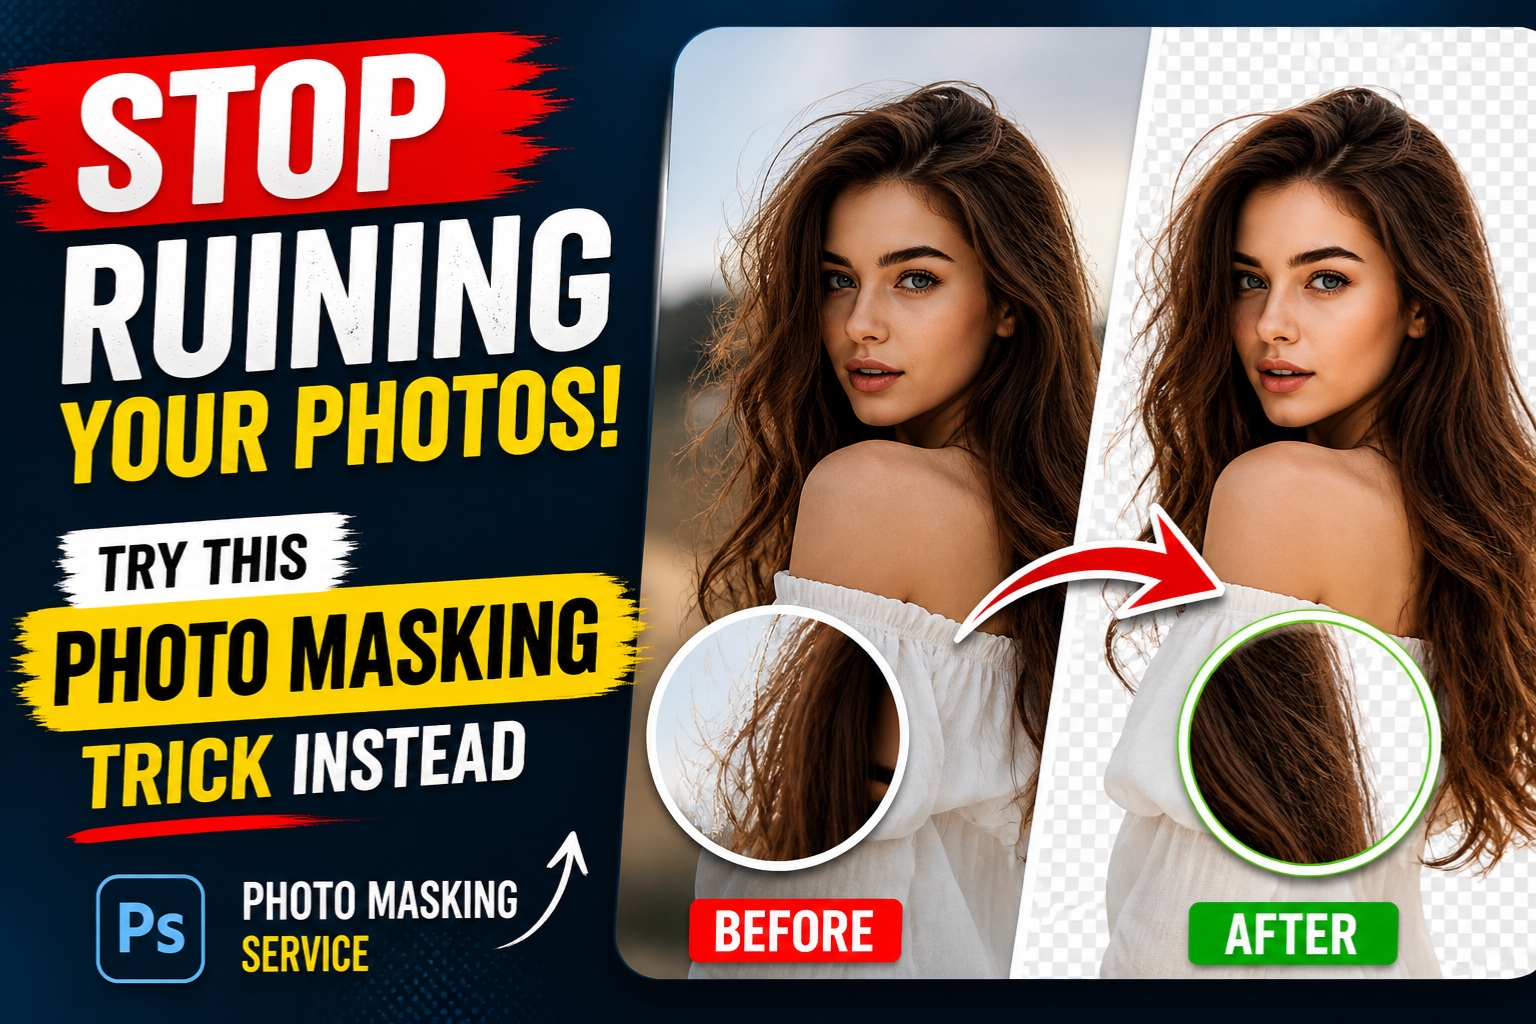
Let’s be honest—most people don’t realize they’re quietly ruining their photos.
You might spend hours adjusting brightness, tweaking colors, or applying filters, yet something still feels… off. The edges look rough. Hair details disappear. Backgrounds don’t blend naturally. And no matter how many edits you make, the image just doesn’t look professional.
The “jagged edge” look is the silent killer of professional photography. Whether you’re an e-commerce giant trying to sell a luxury watch or a digital artist creating a surreal masterpiece, nothing screams “amateur” faster than a poor selection.
If you’ve been relying on the basic Eraser tool or the “Magic Wand” to handle complex edges, I have some news for you: You are ruining your photos. But don’t worry—there is a better way. It’s called Photo Masking, and it’s the secret sauce that separates the pros from the hobbyists.
Why “Cutting Out” Isn’t Enough
In the early days of digital editing, we used to just delete pixels. If you didn’t want a background, you erased it. This is what we call “destructive editing.” Once those pixels are gone, they’re gone. If you realize three hours later that you accidentally shaved off a bit of your model’s ear, you’re in trouble.
More importantly, simple deletion can’t handle the “tough stuff.” Have you ever tried to cut out a model with frizzy hair against a busy street? Or a glass of water where you need to see the background through the liquid?
This is where a professional Photo Masking Service comes into play. Masking isn’t just about removing a background; it’s about transparency, texture, and nuance. It’s the difference between a flat, pasted-on look and a photo that breathes.
The Magic of Photo Masking: What Is It, Really?
Think of photo masking like placing a digital stencil over your image. Instead of throwing away the parts of the photo you don’t want, you’re simply hiding them.
The beauty of this is non-destructive editing. You can refine the mask, tweak the edges, and bring back details without ever losing the original data. But it goes deeper than just hiding things. Masking allows for:
- Handling Transparency: Showing the new background through a veil or a wine glass.
- Hair and Fur Detailing: Capturing every single strand of hair so the subject looks natural.
- Soft Edges: Ensuring there’s a natural transition between the subject and the new environment.
The Different Flavors of Masking (And When to Use Them)
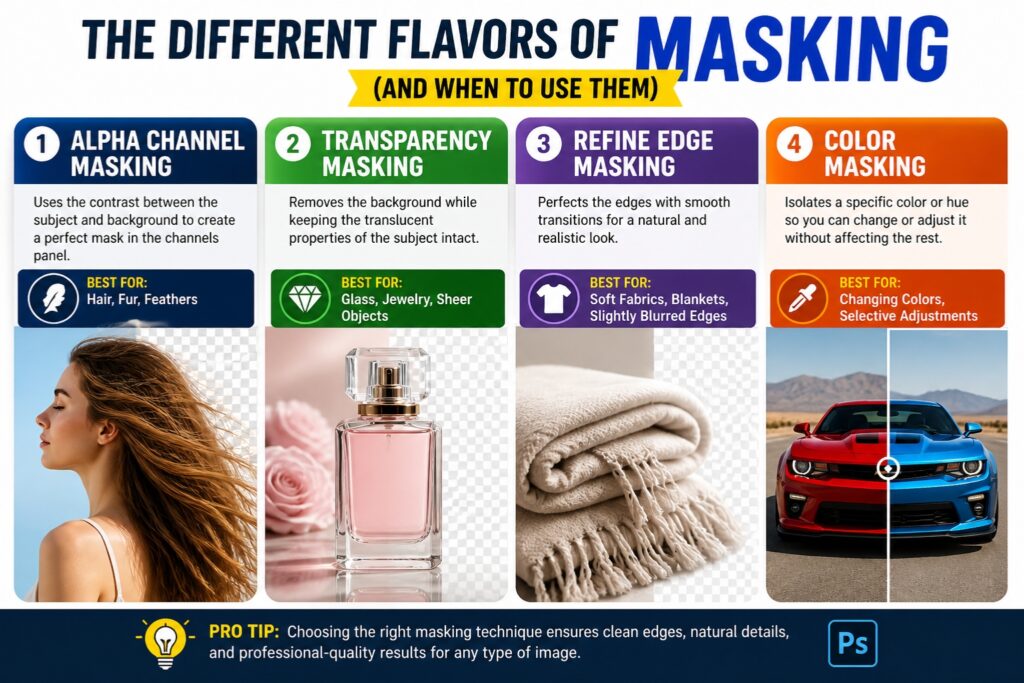
Not all photos are created equal, which means not all masking techniques are the same. When you look into a Photo Masking Service, they usually categorize the work based on the complexity of the edges.
1. Alpha Channel Masking
This is the gold standard for hair, fur, and feathers. It uses the contrast between the subject and the background to create a “map” in the channels panel. It’s how those shampoo commercials get those perfectly crisp, individual strands of hair against a pure white background.
2. Transparency Masking
If you’re selling glassware, jewelry, or anything sheer (like a wedding veil), you need this. It allows the editor to remove the background while keeping the translucent properties of the object intact. Without this, your glass bottles will look like solid plastic.
3. Refine Edge Masking
This is often used for “medium” complexity. It’s great for soft fabrics, blankets, or subjects that have a slight blur. It ensures the transition isn’t too sharp, which would make the photo look “fake.”
4. Color Masking
Sometimes you don’t want to remove the background; you just want to change a specific part of the image. Color masking allows you to isolate a specific hue—like turning a red car blue—without affecting the rest of the scene.
The e-Commerce Connection: Why Your Business Depends on It
If you’re running an online store, your photos are your storefront. Customers can’t touch your products, so they rely entirely on what they see.
The Reality Check: A product with a jagged, poorly edited edge signals “low quality” to a customer’s brain. If the photo looks cheap, the product must be cheap.
By utilizing a professional Photo Masking Service, e-commerce brands can achieve that “floating” look that is standard on platforms like Amazon or Shopify. It allows you to place your product in various “lifestyle” settings without ever having to leave the studio.
Imagine taking one high-quality shot of a sofa and then using masking to place it in a modern loft, a cozy cottage, and a minimalist studio. That’s the power of high-end masking.
Why DIY Usually Fails (The “AI” Trap)
We live in the age of AI. Numerous “One-Click Background Removers” are available. And for a quick meme or a casual social post, they’re great. But for professional work? They almost always fall short.
AI struggles with:
- Low Contrast: When the subject’s hair color is similar to the background.
- Fine Details: It often “hollows out” thin objects or chops off wispy hair.
- Complex Shadows: AI rarely knows how to handle the natural shadow a product casts on a surface.
Professional photo masking requires a human eye. It requires someone who understands how light interacts with surfaces and how a silhouette should actually look. This is why outsourcing to a dedicated service is often cheaper in the long run than trying to fix AI mistakes yourself.
How to Tell if You Need Professional Masking
Not sure if your photos need the “pro touch”? Ask yourself these questions:
- Does my subject have “flyaway” hair? If yes, you need Alpha Channel masking.
- Is my subject see-through? If you’re shooting bottles, glasses, or mesh, you need transparency masking.
- Is the background distracting? If the background takes away from the product, it needs to go.
- Are my edges looking “crunchy”? If your cut-outs look pixelated or sharp, your technique is failing.
The Step-by-Step Trick to Better Masking
If you’re an editor trying to improve, or a business owner wanting to understand the process, here is the “trick” that changes everything: The Multi-Layer Approach.
Instead of trying to mask everything at once, pros break the image down.
- Layer 1: The solid body of the object (usually done with a clipping path).
- Layer 2: The fine details (hair, fur, or soft edges) handled via Alpha Masking.
- Layer 3: The shadows (created or preserved to ground the object).
By combining these layers, you get a result that looks like it was actually photographed in its new environment, rather than just stuck on top of it.
Choosing the Right Photo Masking Service
If you’ve decided that your time is better spent taking photos or running your business than squinting at pixels, you’ll want to find a partner to handle the heavy lifting. When looking for a service, keep an eye out for these three things:
- Hand-Drawn Precision: Ensure they don’t just run your photos through an automated script. You want human editors.
- Turnaround Time: In the fast-paced world of digital marketing, you can’t wait weeks for your files.
- Scalability: Can they handle 1,000 photos as easily as they handle 10?
Final Thoughts: Don’t Settle for “Good Enough”
In a world saturated with visual content, “good enough” is a recipe for being ignored. Whether you are a photographer, an agency, or an e-commerce entrepreneur, the quality of your imagery is your brand’s first impression.
Stop ruining your hard work with sub-par editing. Stop letting jagged edges and “halo effects” distract from your creative vision. By embracing the complexity and precision of a Photo Masking Service, you give your images the professional polish they deserve.
Your photos are an investment. Don’t let a bad cut-out devalue them. Try the masking trick—or better yet, let the experts do it for you—and watch your engagement, sales, and brand authority soar.
Frequently Asked Questions
Q: What is the difference between a Clipping Path and Photo Masking? A: A Clipping Path uses vector shapes to cut out objects with hard, smooth edges (like a smartphone or a book). Photo Masking is used for complex, soft, or transparent edges (like hair, fur, or smoke) where a simple line isn’t enough.
Q: Can masking be used for video? A: Yes, it’s called rotoscoping! It’s the same principle but applied to every frame of a video. It’s much more labor-intensive but results in high-end VFX.
Q: Is photo masking expensive? A: Actually, it’s incredibly cost-effective. Compared to the cost of a reshoot or the lost revenue from poor product photos, a professional masking service is a drop in the bucket.
Q: Can I use masking to change backgrounds on my phone? A: There are apps that do it, but they use AI and usually lack the precision needed for professional or large-scale print use. For high-res results, desktop software like Photoshop (and a skilled hand) is still king.
Leave a Reply